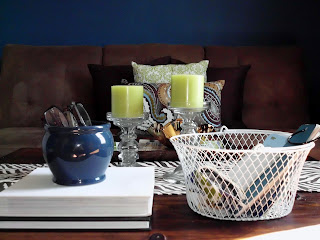
I have dreamed of a peacock blue room since I was a kid, yea I was a weird kid, and subtlety was never my strong suit. I have never had the guts or opportunity to paint a room this color before though...enter our home office. Our home office, is a small room in the front corner of our house with a large closet and big window. It houses a desk and pull out couch for guests...It's uber boring. It's the first room in the house we painted, and we chose a blue gray color, that wasn't terrible, but wasn't me. It read way more "schoolhouse blue" to me and I like more saturated and moody colors. Sadly, we painted this room three years ago, and until a couple weeks ago, it was still this color. Now that business has been picking up (Thanks for that by the way), I really needed my own space to source products, create E-designs, prepare for consultations, pay the occasional bill, do schoolwork, and spend that all important time on Pinterest. Besides, I think Race was sick of looking at graph paper, fabric/paint/wallpaper samples, and papers laying all over the dining room table/living room floor/mancave floor. I was a little scared of the peacock blue in this particular room, because it takes serious balls to paint a small room with only one window this dark of a color. In the end, I decided this wasn't for a client, it was for me and paint is an easy fix if it was too dark.
Because we know we will probably only be here for a couple more years, we were sticking to a tight budget of $200, so I had to make the color work with the furniture we already had. I also had to keep the couch, that I'm not crazy about, but has great function for guests, we happen to have two small guests (in the shape of Race's little brothers) spending the night at least once every weekend, and they need a place to sleep....apparently the floor is just "too hard"...babies...totally kidding...kind of
I tried a couple samples on the wall to see what I liked. (A little tip to really see the color without painting test spots is to tape the samples on every plane of the room, and look at it at 10 a.m., 2 p.m., and after dark because the color will change when the light changes. It's also important to try them on each wall because obviously each wall receives a different amount of natural light.) Even after all of this none of the colors were exactly what I wanted. So, I went to home depot and had a color matched to my favorite pair of high-waisted shorts...
Yes, I'm that girl....
Me and my good buddy/partner in crime Nicole (Thanks for your help!) got going...
I was a little scared, after the first coat because it looked a little bright and a little juvenile. However, paint ALWAYS looks different after it's dry, and like I said it had only been one coat. In the end it turned out perfect...out of my dreams....Ohhh how I love this color. .I want to make out with it...I want to take a bath in it...I want to paint our dogs this color...too far? Tend to do that...I digress. This color has a ton of dimension. It looks different every hour of the day, which I love. It has that moodiness and warmth that I love. And, while it's not for everyone, it's completely me...mine...like it should be called Ashli's peacock blue. I'm getting a patent.
Now because I know you're at the edge of your seat...
Here's a couple before...(these pictures are from my phone and a little old, I forgot to take pictures that day...so sue me...and the frames on the wall look crooked, they weren't I think it's just the weird angle)...
I tried to take pictures at all angles, so that you could see all the dimension in the wall color.
It's worth noting however, the color has a lot more green in it in reality, it's definitely a peacock blue, almost a teal but for whatever reason, in pictures it reads more royal blue.
In the end, I didn't stick to my $200 budget, I spent a whopping $45...Yes, $45...All of the accessories, I already had (yes, I may need a hoarding intervention soon). We used the same furniture, obviously. The shelf over the desk was actually in the closet organizing section at home depot, that we hung on brackets, for a total of $15. (Race actually planned on building some shelves for the office, but we couldn't beat this price...and a lot less work, plus these shelves are meant to put shoes on, so I know they are strong enough for all my pretties.) We had to hang it high for safety reasons, so I took two pages out of a VERY OLD calendar (that happened to have peacock images) and framed them in some frames that were sadly collecting dust in my attic, and hung them beneath. We also bought a 2' x 4' piece of plywood and stained it to use as a mood board for $6. We added some bull dog clips to hang fabric/wallpaper/paint samples from, along with a few other random things. I'm not loving the styling right now, but I'll post pictures when I get it right :)..In any case, it definitely helps keep my desk less cluttered...The white canister on the shelves is from Target (on clearance), and holds all the little things (push pins, paper clips, binder clips/rings, tape). The blue bottle is simply pretty, and I got it at the dollar store (I was buying dog treats and it caught my eye) .The artist print on the shelf is from here (it was only $5 and it's a digital file so you can print it at home, which is great if your impatient like me), and I love it, everyone has to start somewhere, ya know. The mirror over the sofa, was from Target years ago, it was black I painted it gold. In the closet hides all of the office things, there is a small box of files for contracts (with E-design there really isn't much of a paper trail, it's all done online, but I do print all of my PayPal receipts/contracts/consent forms for the blog/etc and need a place to file them), along with my wireless printer/fax machine, and a few other non-attractive officey things.
Let's revisit my office to do list shall we...
PaintNew art-not truly new, but new to this room (and free!) :)- New office chair
- Prettier office supplies- I need some pretty boxes (I knew I should of gone to Michaels yesterday...ugh)
New throw pillows for pull out couch(again not new technically, but new to this room)- MORE ORGANIZATION AND STORAGE!!- I think we've scraped the surface with the shelves and mood board but still need some more work...
7. New lighting
And obviously I still new some more art on those beautiful blue walls...
Eventually, it will all get done and I'll keep you posted along the way...
In the meantime, here's a few painting tips I've learned (mostly the hard way) over the years:
1. Don't use cheap rollers or brushes...My first paint job, I used a dollar store brush and spent the next month picking bristles out of my paint job. They are worth the extra $10, trust me!
2. Tape off...I am famous for not taping off, and just cutting in with an angled brush. Sometimes this works fine, but sometimes not so much, and nothing ruins a new paint job like blue paint on your ceiling or molding. Also, I learned during this actual paint job not to use cheap tape either, after several hours of touching up and scraping molding, trust me it's worth the extra $3...In the past, Frog tape has definitely been my favorite, although a little more expensive. Also, its worth noting, you shouldn't wait until your paint is dry to pull it up. As soon as your done painting, I recommend pulling the tape up....In fact, when we painted this room, I cheated and used cheap masking tape, and because of this spent three hours on my hands and knees chipping paint off of my molding...not fun...it's good now but could have ruined the whole room, I was lucky it came off so easily..
3. Take a nail and hammer a few holes around the lip of the paint lid. This will keep any extra paint from sitting in the lip and will make it drip back down, which will make sure you're not wasting any, and for cheap people like me that's always good.
4. Label your paint cans when you're done, with the room that, that color is in, and the date. This way you're not opening 12 cans of paint to find the right color for touch-ups. Trust me it takes 2 seconds but can save you a frustrating hour down the road....of course this dark color took ALL of the paint I bought, therefore I have none for touch ups...
Anyone else ever painted a small room a "ballsy" color? What do you guys think about the color? Any other painting tips out there? ...Anyone else take shorts in to have them color matched?...No...Just me?
Also, I've added some pictures to the Our Home tab, they're still not great quality, but I read A LOT of blogs, and nothing makes me crazier than clicking on tabs and seeing "coming soon" for two years, so it's a start and I figure it's better than nothing...


Love a good peacock blue!
ReplyDeleteMe too!! Thanks for reading :)
DeleteThanks Jennifer!
ReplyDeleteoh, i LOVE it. it's simply beautiful. and i love the accessories too. the lime green candles are just right and i think the couch is cool. and you're right, it should be called Ashli's Peacock Blue Dream. it's gorgeous.
ReplyDeleteThank you!! I want to bring more of that lime green in, it pops so great against the blue!! I just wish my camera would do the color more justice, it really is even a prettier color in person :)
Delete